Sections on this page: Install WordPress, Install Plugin, Configure Plugin, Suggested Plugins, Configure Email, Configure Pay Per View, Setup Membership, Customize.
Some of these instructions may be outdated and/or incomplete depending on various components and features. If you have any questions or need clarifications, contact us.
First step to using a web host is pointing your domain from registrar (where you registered it) to the name servers specified in hosting info: propagation of new DNS settings usually takes few hours. When domain points to correct web host, installation can be started:
I. WordPress
 This solution is based on WordPress framework. Why WordPress? Over 1/3 of top 10k sites online use WordPress, a platform that stood the test of time, was improved and fine tuned in years. Building on a reliable tested platform and its mature coding standards provides reliability, security, performance.
WordPress should be installed and running first.
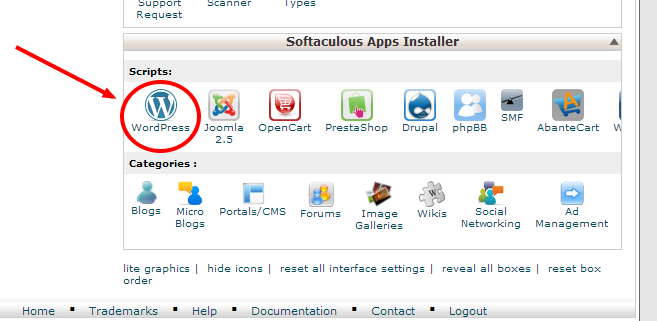
On cPanel hosting, WP installs automatically from CPanel WP Toolkit or Softaculous (if available).
On other types of hosting, manual WP installation may be required.
Path: WordPress should be installed on root of domain/subdomain, not in a folder like wp.
HTTPS: Some browsers like Chrome require HTTPS for allowing publishing of webcam: WordPress URL should be configured with HTTPS if supported by host. VideoWhisper plans include SSL certificate and automated HTTPS configuration (becomes available shortly after pointing domain to web host).
II. Install PPV Live Webcams Plugin
Before installing, make sure your hosting environment meets all requirements.
Warning: Standard web hosting servers and plans don’t include the required specific live streaming server capabilities, server software licensing, tools and configurations or administrators experienced with such features.
We don’t recommend using a provider that does not have experience with these streaming solutions as that often leads to long setup hassle and unreliable service.
Advanced features like listing/importing archives, scheduling playlists require both web and rtmp on same server and specific rtmp side content path configuration.
HTML5 WebRTC, transcoding and HLS delivery requires Wowza SE, streaming session control and FFMPEG with specific codecs on web host.
Broadcasting from Chrome requires HTTPS and a SSL certificate also needs to be configured on streaming server for HTML5 HLS, WebRTC.
Install Plugin
- WebRTC, HLS, MPEG-DASH and other features need to be configured per Wowza SE documentation on 3rd party servers. The basic WebRTC samples that come with Wowza SE can be used to test own Wowza SE setup.
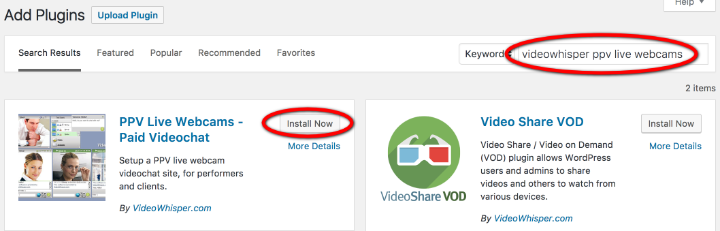 Search for the PPV Live Webcams (in exampled by keyword “videowhisper”) and install it directly from WordPress admin area (recommended).
III. Configure Plugins from WordPress Backend
This turnkey site solution involves multiple plugins for various complex features.
- From Live Webcams > Settings in WP backend, configure live streaming server settings (it’s compulsory for application to work).
For VideoWhisper hosting all streaming settings can be quickly imported from Import tab, as provided in hosting info. - Setup Pages from tab with same name. From Appearance > Menus enable the VideoWhisper menu or add feature pages (Webcams, Performer Dashboard, Client dashboard) pages to main site menu.
- From Settings > Permalinks enable a SEO friendly structure (ex. Post name)
- From Settings > General enable Membership: Anyone can register. Plugin will create and show roles on the default registration page (usually accessible at /wp-login.php?action=register ). You may need to add registration link to a menu, page or a widget if not accessible to your users.
- Edit Categories from Webcams > Categories. Webcams use global site content categories.
- Install, enable and configure a billing plugin, setup PPV (described in a special section below).
- Install, enable and configure plugins for performers to upload videos and pictures to their profiles: Video Share VOD and Picture Gallery.
Also Rate Star Reviews to enable content/room ratings. - Install and enable the MicroPayments – Paid Membership plugin. Setup pages from its settings to enable My Wallet page for easily managing tokens.
Users can buy content or membership using same token system used for tips and pay per minute as this plugin also manages specific feature pages: Content, My Assets, My Content, Membership. - After testing main features: Customize visual identity, setup Privacy Policy / Terms of Use and other pages required for your project.
Troubleshooting: You can resent main plugin settings from Reset tab in backend. Plugin also shows default settings for key customisations, if you need to restore specific defaults.
Recommended Plugins
- WordFence: site firewall and scanner (configure to protect by limiting failed login attempts, bot attacks / flood request, scan for malware or vulnerabilities).
- To prevent spam registrations use a captcha plugin (get a key from google) and user verification plugin to automatically verify users by email confirmation. Also setup a special email account and a SMTP plugin to make sure users receive verification emails.
- A SMTP mailing plugin like Easy WP SMTP and setup a real email account from your hosting backend (setup an email from CPanel) or external (Gmail or other provider), to send emails using SSL and all verifications. This should reduce incidents where users don’t find registration emails due to spam filter triggering. Also instruct users to check their spam folders if they don’t find registration emails.
- For sites with adult content, an age verification / confirmation plugin should be deployed. Such sites should also include a page with details for 18 U.S.C. 2257 compliance. Also, read more about Adult Videochat Business setups.
- Updraft Plus – Automated WordPress backup plugin. Free for local storage. For production sites external backups are recommended (premium). Great to have restore points in case of failed tweaks, hacks, data loss.
- HTTPS redirection plugin like Really Simple SSL , if you have a SSL certificate and HTTPS configured (as on VideoWhisper plans). HTTPS is required to broadcast webcam, in latest browsers like Chrome. If you also use HTTP urls (not recommended), disable “Auto replace mixed content” option to avoid breaking external HTTP urls (like HLS).
- WP Super Cache: cache (configured to not cache for known users or GET parameters, great for protecting against bot or crawlers eating up site resources)
- JetPack: site optimizations (performance, security, monitoring, social media publishing).
Turnkey Features Plugins
- WooCommerce : ecommerce platform
- BuddyPress : community (member profiles, activity streams, user groups, messaging)
- Sensei LMS : learning management system
- bbPress: clean discussion forums
TroubleShoot Plugins
Suggestion: install only plugins that are really necessary for project because adding many results in higher setup complexity (hassle with conflicting settings or hooks) and high resource usage per request (lower user capacity and speed for website). Often when adding plugins, less is more.
Plugins should be activated and configured, one by one.
– If site gets broken by a plugin you add, you can remove last added plugin by ftp from /public_html/wp-content/plugins or contact technical support.
Plugins should be updated often to latest versions. Using older versions is high risk due to public exploits or bugs from older versions.
TroubleShoot Emails: Users don’t see registration emails
As WordPress registration emails are very common, many email providers will move these emails in Spam folders or even reject emails that don’t meet some checks.
- Setup real email account that passes SPF & DKIM checks (setup from CPanel). Use a SMTP plugin for WordPress to send all site emails trough that account.
- Also add an automated user email verification plugin (as suggested) that changes WP emails from default common templates when requesting verification by email.
- Do some tests yourself on popular email sites and mark the emails as Not Spam if showing in Spam folders. This can unblock future emails on that service, after users marked it as safe. Theory: For big email providers, new email senders start with low reputation and positive feedback increases it.
- Advise users to check spam folders after registration and mark emails as Not Spam. Depending on provider, automated emails like for registrations can go to spam. Before production test registering on few major providers like gmail, yahoo, hotmail.
- If you can’t find the emails, test mailing by sending directly from CPanel webmail and troubleshoot with CPanel Email Deliverability tool.
- Try using an external mailing account / service by configuring that in SMTP settings. Certain mail servers just reject most emails from hosting provider networks and require specific email providers from a different network or service for best deliverability.
- Web Hosting Email Limitation: Web hosting plans have email rate limitations to protect servers and network from being blacklisted as mass spammers. Getting blacklisted affects all clients on a shared server or different servers if a class of network IPs got blacklisted and results in emails not being delivered for long time.
– If you need to do email campaigns and send thousands of emails per day, use a specialized mass emailing service.
Trying to send directly from website will result in rate being reached, full queue for days and regular site emails for registration being delayed or not being sent.
In example, if there’s a 30 emails per hour limit for an entry plan, when limit is reached additional emails are delayed for next hour. If there’s already a big queue of unsent emails, registration emails can get sent days later or never.
When sending newsletters or mass emails your domain, dedicated site IP, server hostname can get blacklisted due to regulation compliance details or users reporting it as spam (sometimes incorrectly). So it should be handled by an external professional service specialized in sending mass emails or newsletter.
– If hosting plan is underpowered (i.e. more than 30 registration/confirmation or other automated emails per hour for an entry plan) account should be upgraded to a higher plan. Higher plans have higher mailing allocation.
TroubleShoot Interface: Blocked tabs in dashboard
Interface uses Semantic UI which requires jQuery. Your theme or plugins may disable jQuery, load older versions or generate errors that break JS features.
Try using latest jQuery version with a plugin like jQuery Updater or similar.
Some themes implement smooth scrolling or similar scripts that may cause conflicts, block scrolling or hide interface content. Try disabling such features. To check if theme is the cause, try temporary switching to a different theme (one of the default WP themes).
TroubleShoot App Loading: HTML5 Videochat does not show
Sometimes app JS is prevented from loading by web hosting (.htaccess or server security rules).
Try renaming .htaccess and saving permalinks to generate a new one. If that doesn’t work try temporary disabling firewall or other rules that may block access to urls and configuring it if causing the issue.
IV. Pay Per View (PPV): Pay Per Minute (PPM) Setup
- First install myCRED and/or TeraWallet for WooCommerce WordPress plugin. These wallet plugins require configuration as described in section below.
- Select Active Wallet to use with solution from Live Webcams > Settings > Billing Wallet .
- If activating both wallets, also configure Multi Wallet settings: Show will display balances for available wallets, Manual will allow transferring to active wallet, Auto will automatically transfer all to active wallet.
- From Live Webcams > Settings > Pay Per Minute tab setup:
- client cost per minute
- grace time
- ratio earned by performer
- minimum balance to request show, continue show
- optionally, performer cost per minute for other type of service scenarios
- From Group Chat Modes tab configure cost per minute for paid group chat modes and special user modes like Voyeur, 2 Way. Client sessions in paid/free can be reviewed in Live Webcams > Session Logs .
- From Tips tab configure tip options, earning ration, cooldown.
- From Cam Listings tab configure currency/credit labels.
Wallet Configuration
MyCred Wallet Configuration
- Enable buyCRED addon and configure at least 1 payment gateway for users to be able to buy credits.
“Thank You Page” should be set to “Webcams” and “Cancellation Page” to “Buy Credits” from from buyCRED settings.
This addon allows users to buy credits with multiple gateways:- PayPal Standard
- Skrill (Moneybookers)
- NETbilling (supports adult sites)
- Zombaio (supports adult sites)
- BitPay (bitcoin)
Extra MyCred billing gateways are available for additional fees (2checkout, ComproPago, CoinBase, CoinPayments, PayFast, Payza, Robokassa, Stripe, WePay) from myCRED store.
- Setup a page for users to buy credits with shortcode [mycred_buy_form].
- Optionally, setup a page for users to see private shows they paid for with shortcode [mycred_sales_history].
- Optionally, you can use the Sell Content module to also sell access to public video chat for certain webcam posts.
Select “Webcams I Manually Select” as Post Types you want to sell in Sell Content settings tab so access to webcams can be sold from backend. You can also configure payout to content author from there (Profit Share) and expiration, if necessary.
Important: Selecting All for any post types (pages, posts, webcams) will make ALL inaccessible without payment.
WooCommerce Wallet Configuration
- Install and activate WooCommerce, required for Woo Wallet plugin.
- Configure WooCommerce payment gateways from WooCommerce > Settings, Payments tab.
- Activate WooWallet plugin. Configure WooWallet > Settings and enable payment gateways you want to use.
- Setup a page for users to buy credits with shortcode [woo-wallet]. My Wallet section is also available in WooCommerce My Account page (/my-account) if you add that to your site menus.
- WooWallet supports multiple free and premium payment extensions:
- PayPal (Standard, Checkout)
- Stripe (CC, Apple Pay, Google Pay, SEPA, Bancontact, Sofort, Giropay, EPS, iDeal, Przelewy24, Alipay, Multibanco)
- Square (CC U.S, Canada, Australia, Japan and the UK)
- Amazon Pay
- PayFast
- Venmo
- eWay (SG, MY, HK, AU, NZ)
- Klarna (now, later, slice)
- Authorize.Net
- SagePay (UK)
- WorldPay
- 2 Checkout
- … and more
V. Membership Access Setup (Optional)
Solution allows restricting features by customizable role names. Any membership plugin can be used to setup paid roles. These can be configured in solution for accessing specific features or functionality for performers, clients.
- To setup paid membership, first install a membership plugin to manage paid member roles.
– With the MicroPayments – Paid Membership, Content, Downloads plugin, users can buy membership using same token system used for tips/gifts and pay per minute (MyCred and/or WooWallet + WooCommerce). Site visitors first register as free users, buy tokens and use micropayments to upgrade their membership.
This plugin also allows setting up paid access to content for a flat fee (access price), using either MyCred Sell Content addon or WooCommerce. For WooCommerce, this plugin creates a product that needs to be purchased for user to access that specific content (room, page, post, download, video).
– For direct membership purchase (where visitors register by paying, without using a free user role), WooCommerce Memberships & Subscriptions (premium plugins) allows setting up paid paid membership roles:- WooCommerce Memberships Setup paid membership as products. Leveraged with Subscriptions plugin allows membership subscriptions.
- WooCommerce Subscriptions Setup subscription products, content. Leverages Membership plugin to setup membership subscriptionsSetup at least 1 paid role that members get by purchasing membership.
- WooCommerce Booking Setup booking products with calendar, availability, booking deposits, confirmations for 1 on 1 or group bookings.
Include the room link or video call link in booking product description. - WooCommerce Product Vendors Allow multiple vendors to sell via your site and in return take a commission on sales. Leverage with Product Reviews Pro.
- From plugin Settings configure roles and features to match new paid member roles.
-Client tab: configure client role to match and access to public video chat, if paid members are clients.
-Performer tab: configure performer role name to match, if paid member is performer.
-Integration tab: disable Registration Form Roles, if certain roles are obtained by payment.